Above is an image of using filters to change the opening sequence to attract more people for the target audience. This will keep the audience engaged with the sequence and enjoy it even more.
Transitions.
Above is an image that shows how we used to jump from scene to scene. This made the opening sequence quick and easy to follow.
Enhance meaning
Above is an image that shows how we added more effects to enhance the meaning of the opening sequence. For example the image has text in the beginning of the clip that shows the title of the SkinWalker. This attracts the audience as they are intrigued as what is going to happen next.
Below is evidence of health and safety information and evidence that we used before we filmed. Furthermore here is evidence of us using and reading information.
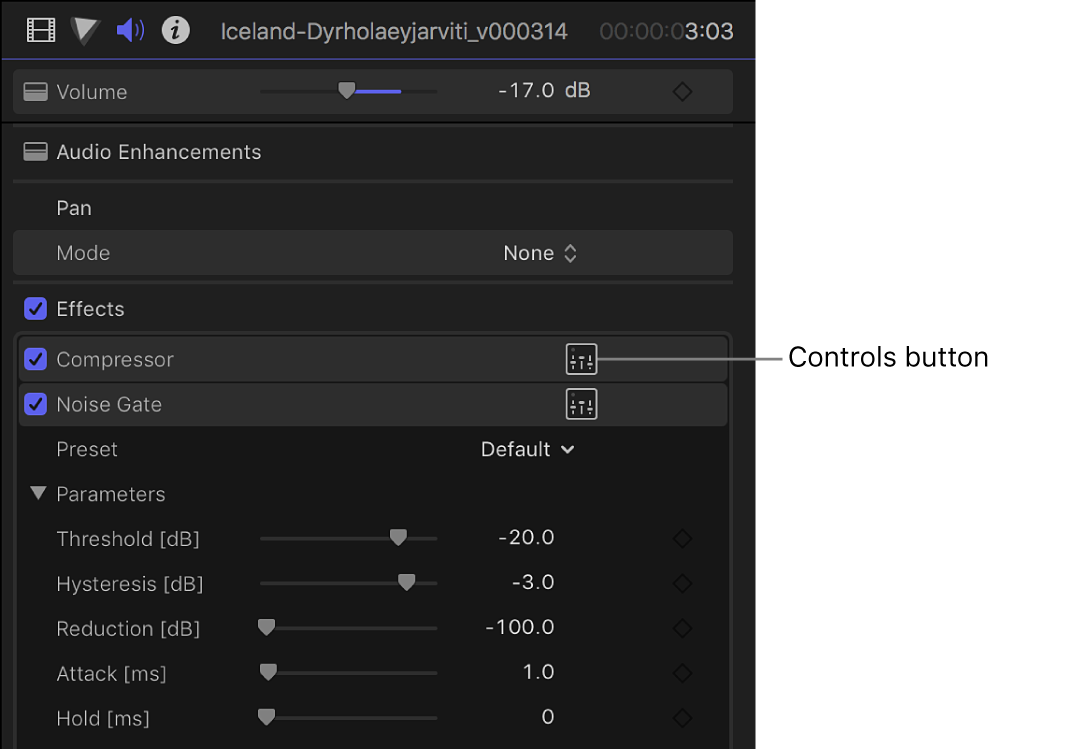
The sound effects used is a code\conventions. This confirms that this is a thriller genre, and helps create various moods for the audiences to experience these different moods. At 1:19 the music used, gives a sense of thrill and suspense to the audience, along with the scene that is shown. Overall this gives an eerie vibe to the audience and will intrigue them to want to continue watching it.
Codes & Conventions 2
The listing was quite bright as we were outside. But once harleen's character entered the 'forest' at 01:04 in the opening sequence, the lighting seemed more dim and this helped create a mysterious yet suspenseful outcome.
Codes & Conventions 3
The editing that has been done includes, flashes, transitions, black outs with bits of description and added sound effects. These all create a great impact on the finished piece, and attracts the audience with the overall piece.
In the image above it clearly shows us that we have are saving the drafts for the opening sequence once we have finished all the editing in the film.
Rendering.
In the image above shows us that rendering has occurred. This is part of the editing stage of the post production.
Exporting.
Once we were happy with the ending result of the opening sequence, we were then able to export this into a video and able to upload it so that everyone can have access to it.
One technique that we used was adding in music. This was exported into an mp3 file which we then inserted into the movie. This allowed the opening sequence to become more interesting.
Increasing audio
Another technique that we used was increasing the audio. This was done by clicking on the volume button and increasing the audio. This allowed the opening sequence to become more clearer for the audience so that they can hear everything that is happening.
Adding in sounds to match with the sound effects board
Lastly another technique that we used was adding in sounds to match with the sound effects board. This was exported into an mp3 file which we then inserted into the movie. This allowed the opening sequence to become more interesting and therefore allowed us to use the sounds we said we were going to use in the opening sequence.
Video Editing:
Cutting into a black screen
One technique that we used was cutting into a black screen. All we had to do is get a black image and insert it into final cut pro. This allowed the opening sequence to become more suspenseful.
Adding in transitions
Another technique that we used was adding transitions. This was done by choosing different transitions from final cut pro. This allowed the opening sequence to become more engaging for the audience and make the film look more professional.
Changing the lighting of particular scenes
Lastly another technique that we used was changing the lighting of particular scenes. This was done by changing the lighting by selecting the scene on final cut pro and change the gradient of the lighting. This allowed the opening sequence to become more interesting and linking to the client brief.
Graphics/Text Editing:
Adding in the title of the SkinWalker
One technique that we used was adding in the title of the SkinWalker. This was done by using final cut pro to add a title in and using another software to make the title look spooky. This allowed the opening sequence to become more full of suspense.
Adding in the spell in the background
Another technique that we used was adding the spell in the background. This was done by using final cut pro to add a title in. This allowed the audience to understand what was being said when the SkinWalker was casting the spell.
Changing the style of text
Lastly another technique that we used changing the style of text. This was done by using final cut pro to change the text style. This allowed the audience to understand what is happening and making the opening sequence stand out.
Here we can see that I am using the script to know what was needing to film and who was in it. One strength I had was everyones sections was given to them. This allowed me to focus on my own pieces of and took responsibilities for my filming. One weakness I had was that the script I printed wasn't fully clear. Therefore I had to look closely when looking at my lines.
Here we can see that I am using the shooting script to know what scenes needing to be filmed. One strength I had was that I had my own section of the shooting script. This allowed me to film my section of the opening sequence. One weakness I had was that the script I printed wasn't fully clear, it was complicated to read. Therefore I had to look closely so that I knew what I was going to film.
Here we can see that I am using the storyboard to know what scenes needing to be filmed and what I was in charge off. One strength we had was that we had spilt up the storyboard so that I knew what I had to do for my portion of the video. One weakness I had was that the storyboard was printed. This means that I didn't have the original sheets as it got damaged while during the production phase.
Evidence on location.
Evidence of using health and safety.
Evidence of setting up camera equipment
This video shows how I put together the camera and tripod when I am filming these scenes.
Strengths.
One strength when of me setting up the equipment is that I knew how to set up the tripod. This was a easy thing to do as I knew exactly how high I wanted the tripod to be and how to extend the tripod safety and effectively.
Weaknesses.
From looking at the video, we can see that I had trouble placing the camera onto the tripod. This is because when I was setting up, the attachment to the tripod wasn't working well. This is something for me to improve on next time when setting up the equipment.


.png)
.png)
.png)
.png)